
乒乓球游戏教程
介绍
欢迎来到Pong教程。
本教程将教你如何使用Kivy编写乒乓球游戏。我们将从一个类似于:ref:`quickstart`中描述的基础应用开始,逐步将其转变为一个可玩的乒乓球游戏,并在此过程中详细说明每一步。
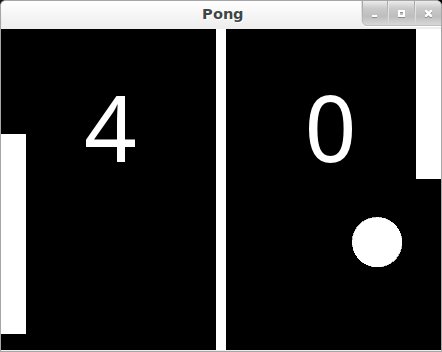
开始本教程前,请先核对以下清单:
如果你已经阅读了编程指南,并且理解了基本的Widget概念(一个简单的绘图应用)以及kv语言的基本概念(KV 语言),那么你或许可以跳过前两步,直接进入第三步。
备注
你可以在Kivy示例目录下的`tutorials/pong/`中找到完整的源代码,以及每一步的源代码文件。
准备好了?太好了,我们开始吧!
开始使用
开始使用
让我们从一个非常简单的Kivy应用开始,让它运行起来。为游戏创建一个目录,并新建一个名为 main.py 的文件。
 1from kivy.app import App
 2from kivy.uix.widget import Widget
 3
 4
 5class PongGame(Widget):
 6    pass
 7
 8
 9class PongApp(App):
10    def build(self):
11        return PongGame()
12
13
14if __name__ == '__main__':
15    PongApp().run()
继续运行应用程序。此时它应该只显示一个黑色窗口。我们所做的是创建一个非常简单的Kivy App,它创建了我们的``PongGame`` Widget类的实例,并将其作为应用程序UI的根元素返回,你可以将其想象为一个Widget的层次树。Kivy将这个widget树放置在默认的Window中。在下一步中,我们将通过定义``PongGame widget``的外观来绘制Pong的背景和分数。
添加简单图形
创建 pong.kv
我们将使用一个.kv文件来定义``PongGame``类的外观和感觉。由于我们的:class:~kivy.app.App`类名为``PongApp`,我们可以简单地在同一目录下创建一个名为``pong.kv``的文件,该文件将在应用运行时自动加载。因此,请创建一个名为*``pong.kv``*的新文件,并添加以下内容。
 1#:kivy 1.0.9
 2
 3<PongGame>:
 4    canvas:
 5        Rectangle:
 6            pos: self.center_x - 5, 0
 7            size: 10, self.height
 8
 9    Label:
10        font_size: 70
11        center_x: root.width / 4
12        top: root.top - 50
13        text: "0"
14
15    Label:
16        font_size: 70
17        center_x: root.width * 3 / 4
18        top: root.top - 50
19        text: "0"
备注
常见错误:kv 文件的名称(例如 pong.kv)必须与应用名称(例如 PongApp,即 App 结尾前的部分)相匹配。
如果你现在运行这个应用,你应该会在中间看到一条垂直的条,以及两个零,它们将用于显示玩家的得分。
解释 Kv 文件语法
在进入下一步之前,您可能想仔细看看我们刚刚创建的kv文件的内容,弄清楚发生了什么。如果您已经理解了其中的原理,可以直接跳到下一步。
在第一行,我们有:
#:kivy 1.0.9
每个 kv 文件的第一行都是必需的。它应以 #:kivy 开头,后跟一个空格和其面向的 Kivy 版本(这样 Kivy 可以确保你至少拥有所需版本,或稍后处理向后兼容性)。
之后,我们开始定义应用于所有``PongGame``实例的规则::
<PongGame>:
    ...
与Python类似,kv文件使用缩进来定义嵌套块。在``<和>``字符内以类名定义的块是一个:class:~kivy.uix.widget.Widget`规则。它将应用于命名类的任何实例。如果在我们的示例中将``PongGame``替换为``Widget`,那么所有Widget实例都将包含垂直线和两个Label小部件,因为这将为所有Widget实例定义这些规则。
在规则部分内,您可以添加各种块来定义将应用于其上的小部件的样式和内容。您可以:
设置属性值
添加子部件
在 canvas 部分中定义,您可以添加图形指令,以定义该控件如何渲染。
我们在 <PongGame> 规则中的第一个块是 canvas 块:
1<PongGame>:
2    canvas:
3        Rectangle:
4            pos: self.center_x - 5, 0
5            size: 10, self.height
这个canvas块表明``PongGame``控件应当绘制一些图形原语。在此例中,我们向canvas添加了一个矩形。我们将矩形的pos设置为控件水平中心左侧5像素,y为0。矩形的大小设置为宽度10像素,高度为控件的高度。这样定义图形的妙处在于,当值表达式中使用的任何控件的属性发生变化时,渲染出的矩形将自动更新。
备注
尝试调整应用程序窗口的大小,并注意会发生什么。没错,整个用户界面会自动调整大小。窗口的标准行为是根据元素的`size_hint`属性来调整其大小。默认的widget size_hint是(1,1),意味着它会在x方向和y方向上都拉伸100%,从而填满可用空间。由于矩形的位置和大小以及得分标签的center_x和top是在``PongGame``类的上下文中定义的,这些属性会在对应的widget属性变化时自动更新。使用Kv语言可以为您提供自动属性绑定。:)
我们添加的最后两个部分看起来非常相似。它们各自将一个Label小部件作为子部件添加到``PongGame``小部件中。目前,这两个标签上的文本都只是设置为*"0"*。一旦我们实现了逻辑,我们会将其与实际得分关联起来,但由于我们设置了更大的字体大小,并将它们相对于根小部件进行了定位,这些标签看起来已经很不错了。在子块内部可以使用``root``关键字来引用规则所应用的父/根小部件(在此例中为``PongGame``):
 1<PongGame>:
 2    # ...
 3
 4    Label:
 5        font_size: 70
 6        center_x: root.width / 4
 7        top: root.top - 50
 8        text: "0"
 9
10    Label:
11        font_size: 70
12        center_x: root.width * 3 / 4
13        top: root.top - 50
14        text: "0"
添加Ball。
添加Ball。
好的,我们有了一个基本的乒乓球场地可以游戏,但还需要玩家和一个可以击打的球。让我们从球开始。我们将添加一个新的 PongBall 类来创建一个作为我们球的部件,并让它弹跳起来。
PongBall 类
以下是PongBall类的Python代码:
 1class PongBall(Widget):
 2
 3    # velocity of the ball on x and y axis
 4    velocity_x = NumericProperty(0)
 5    velocity_y = NumericProperty(0)
 6
 7    # referencelist property so we can use ball.velocity as
 8    # a shorthand, just like e.g. w.pos for w.x and w.y
 9    velocity = ReferenceListProperty(velocity_x, velocity_y)
10
11    # ``move`` function will move the ball one step. This
12    #  will be called in equal intervals to animate the ball
13    def move(self):
14        self.pos = Vector(*self.velocity) + self.pos
以下是用于将球绘制为白色圆形的kv规则:
1<PongBall>:
2    size: 50, 50
3    canvas:
4        Ellipse:
5            pos: self.pos
6            size: self.size
为了使一切正常工作,您还需要添加所使用的 属性 Property 类的导入,以及 Vector 的导入。
以下是此步骤更新后的完整Python代码和kv文件:
- main.py:
 1from kivy.app import App
 2from kivy.uix.widget import Widget
 3from kivy.properties import NumericProperty, ReferenceListProperty
 4from kivy.vector import Vector
 5
 6
 7class PongBall(Widget):
 8    velocity_x = NumericProperty(0)
 9    velocity_y = NumericProperty(0)
10    velocity = ReferenceListProperty(velocity_x, velocity_y)
11
12    def move(self):
13        self.pos = Vector(*self.velocity) + self.pos
14
15
16class PongGame(Widget):
17    pass
18
19
20class PongApp(App):
21    def build(self):
22        return PongGame()
23
24
25if __name__ == '__main__':
26    PongApp().run()
- pong.kv:
 1#:kivy 1.0.9
 2
 3<PongBall>:
 4    size: 50, 50
 5    canvas:
 6        Ellipse:
 7            pos: self.pos
 8            size: self.size
 9
10<PongGame>:
11    canvas:
12        Rectangle:
13            pos: self.center_x - 5, 0
14            size: 10, self.height
15
16    Label:
17        font_size: 70
18        center_x: root.width / 4
19        top: root.top - 50
20        text: "0"
21
22    Label:
23        font_size: 70
24        center_x: root.width * 3 / 4
25        top: root.top - 50
26        text: "0"
27
28    PongBall:
29        center: self.parent.center
30
请注意,不仅添加了 <PongBall> 部件的规则,还在 <PongGame> 部件的规则中添加了一个子部件 PongBall。
添加球体动画
让球移动
太好了,现在我们有了一个球,它甚至还有一个``move``函数……但它还没有动起来。让我们来解决这个问题。
在时钟上调度函数
我们需要定期调用球的``move``方法。幸运的是,Kivy通过允许我们使用:class:`~kivy.clock.Clock`并指定间隔来调度任何我们想要的函数,这使得这一操作变得非常简单:
Clock.schedule_interval(game.update, 1.0/60.0)
例如,这一行代码会使游戏对象的``update``函数每六十分之一秒(即每秒60次)被调用一次。
对象属性/引用
不过我们还有另一个问题。我们希望确保PongBall的``move``函数被定期调用,但在我们的代码中,由于我们只是通过kv文件在``PongGame``类的kv规则中添加了球对象,因此没有任何对球对象的引用。我们唯一的游戏引用是在应用程序的build方法中返回的那个。
既然我们不仅要移动球(例如让它从墙壁和之后的玩家球拍上反弹),我们可能无论如何都需要为我们的``PongGame``类添加一个``update``方法。此外,由于我们已经有了对游戏对象的引用,我们可以在应用程序构建时轻松地安排其新的``update``方法::
 1class PongGame(Widget):
 2
 3    def update(self, dt):
 4        # call ball.move and other stuff
 5        pass
 6
 7class PongApp(App):
 8
 9    def build(self):
10        game = PongGame()
11        Clock.schedule_interval(game.update, 1.0/60.0)
12        return game
然而,这仍然无法改变我们没有对由kv规则创建的``PongBall``子控件引用的这一事实。为了解决这个问题,我们可以在``PongGame``类中添加一个:class:ObjectProperty <kivy.properties.ObjectProperty>,并将其与kv规则中创建的控件连接起来。一旦完成,我们就可以轻松地在``update``方法中引用球的属性,甚至让它从边缘反弹回来:
 1class PongGame(Widget):
 2    ball = ObjectProperty(None)
 3
 4    def update(self, dt):
 5        self.ball.move()
 6
 7        # bounce off top and bottom
 8        if (self.ball.y < 0) or (self.ball.top > self.height):
 9            self.ball.velocity_y *= -1
10
11        # bounce off left and right
12        if (self.ball.x < 0) or (self.ball.right > self.width):
13            self.ball.velocity_x *= -1
别忘了在 kv 文件中将其连接起来,通过给子部件一个 id,并将 PongGame 的 ball ObjectProperty 设置为该 id:
1<PongGame>:
2    ball: pong_ball
3
4    # ... (canvas and Labels)
5
6    PongBall:
7        id: pong_ball
8        center: self.parent.center
备注
此时,所有设置都已就绪,球可以开始弹跳了。如果你正跟着我们一起编码,可能会好奇为什么球没有移动。球的x和y方向速度都被设置为0。在下面的代码清单中,向``PongGame``类添加了一个``serve_ball``方法,并在应用的``build``方法中调用它。该方法为球设置了随机的x和y速度,并重置了位置,这样我们以后可以在玩家得分时用它来重置球。
以下是此步骤的完整代码:
- main.py:
 1from kivy.app import App
 2from kivy.uix.widget import Widget
 3from kivy.properties import (
 4    NumericProperty, ReferenceListProperty, ObjectProperty
 5)
 6from kivy.vector import Vector
 7from kivy.clock import Clock
 8from random import randint
 9
10
11class PongBall(Widget):
12    velocity_x = NumericProperty(0)
13    velocity_y = NumericProperty(0)
14    velocity = ReferenceListProperty(velocity_x, velocity_y)
15
16    def move(self):
17        self.pos = Vector(*self.velocity) + self.pos
18
19
20class PongGame(Widget):
21    ball = ObjectProperty(None)
22
23    def serve_ball(self):
24        self.ball.center = self.center
25        self.ball.velocity = Vector(4, 0).rotate(randint(0, 360))
26
27    def update(self, dt):
28        self.ball.move()
29
30        # bounce off top and bottom
31        if (self.ball.y < 0) or (self.ball.top > self.height):
32            self.ball.velocity_y *= -1
33
34        # bounce off left and right
35        if (self.ball.x < 0) or (self.ball.right > self.width):
36            self.ball.velocity_x *= -1
37
38
39class PongApp(App):
40    def build(self):
41        game = PongGame()
42        game.serve_ball()
43        Clock.schedule_interval(game.update, 1.0 / 60.0)
44        return game
45
46
47if __name__ == '__main__':
48    PongApp().run()
- pong.kv:
 1#:kivy 1.0.9
 2
 3<PongBall>:
 4    size: 50, 50
 5    canvas:
 6        Ellipse:
 7            pos: self.pos
 8            size: self.size
 9
10<PongGame>:
11    ball: pong_ball
12
13    canvas:
14        Rectangle:
15            pos: self.center_x - 5, 0
16            size: 10, self.height
17
18    Label:
19        font_size: 70
20        center_x: root.width / 4
21        top: root.top - 50
22        text: "0"
23
24    Label:
25        font_size: 70
26        center_x: root.width * 3 / 4
27        top: root.top - 50
28        text: "0"
29
30    PongBall:
31        id: pong_ball
32        center: self.parent.center
33
连接输入事件
添加玩家并响应触摸输入
太好了,我们的球已经弹来弹去了。现在唯一缺少的就是可移动的玩家球拍和计分功能。我们不会再次详细讲解创建类和kv规则的每一个细节,因为这些概念在前面的步骤中已经介绍过了。相反,让我们专注于如何根据用户输入来移动Player控件。你可以在本节末尾找到``PongPaddle``类的完整代码和kv规则。
在Kivy中,一个widget可以通过实现:meth:on_touch_down <kivy.uix.widget.Widget.on_touch_down>、:meth:`on_touch_move <kivy.uix.widget.Widget.on_touch_move>`和:meth:`on_touch_up <kivy.uix.widget.Widget.on_touch_up>`方法来对输入作出反应。默认情况下,Widget类实现这些方法时,仅在其所有子widget上调用相应的方法以传递事件,直到某个子widget返回``True``为止。
Pong游戏相当简单。球拍只需上下移动。实际上,它简单到我们甚至不需要让玩家控件自己处理事件。我们只需为``PongGame``类实现``on_touch_move``函数,并根据触摸发生在屏幕左侧还是右侧来设置左或右玩家的位置。
检查 on_touch_move 处理器:
1def on_touch_move(self, touch):
2    if touch.x < self.width/3:
3        self.player1.center_y = touch.y
4    if touch.x > self.width - self.width/3:
5        self.player2.center_y = touch.y
我们将为每位玩家使用一个 NumericProperty 来记录分数。PongGame 的分数标签通过更改 score 这个 NumericProperty 来保持更新,这反过来会更新 PongGame 子标签的文本属性。这种绑定之所以发生,是因为 Kivy 的 properties 会自动绑定到其对应的 kv 文件中的任何引用。当球从侧面逃出时,我们将更新分数并通过修改 PongGame 类中的 update 方法重新发球。PongPaddle 类也实现了一个 bounce_ball 方法,使得球根据击打拍子的位置以不同方式反弹。以下是 PongPaddle 类的代码:
1class PongPaddle(Widget):
2
3    score = NumericProperty(0)
4
5    def bounce_ball(self, ball):
6        if self.collide_widget(ball):
7            speedup  = 1.1
8            offset = 0.02 * Vector(0, ball.center_y-self.center_y)
9            ball.velocity =  speedup * (offset - ball.velocity)
备注
这个球弹跳算法非常简单,但如果球从侧面或底部撞击球拍,可能会出现奇怪的行为……如果你愿意,可以尝试自己修复这个问题。
这就是它在上下文中的样子。基本完成了:
- main.py:
 1from kivy.app import App
 2from kivy.uix.widget import Widget
 3from kivy.properties import (
 4    NumericProperty, ReferenceListProperty, ObjectProperty
 5)
 6from kivy.vector import Vector
 7from kivy.clock import Clock
 8
 9
10class PongPaddle(Widget):
11    score = NumericProperty(0)
12
13    def bounce_ball(self, ball):
14        if self.collide_widget(ball):
15            vx, vy = ball.velocity
16            offset = (ball.center_y - self.center_y) / (self.height / 2)
17            bounced = Vector(-1 * vx, vy)
18            vel = bounced * 1.1
19            ball.velocity = vel.x, vel.y + offset
20
21
22class PongBall(Widget):
23    velocity_x = NumericProperty(0)
24    velocity_y = NumericProperty(0)
25    velocity = ReferenceListProperty(velocity_x, velocity_y)
26
27    def move(self):
28        self.pos = Vector(*self.velocity) + self.pos
29
30
31class PongGame(Widget):
32    ball = ObjectProperty(None)
33    player1 = ObjectProperty(None)
34    player2 = ObjectProperty(None)
35
36    def serve_ball(self, vel=(4, 0)):
37        self.ball.center = self.center
38        self.ball.velocity = vel
39
40    def update(self, dt):
41        self.ball.move()
42
43        # bounce off paddles
44        self.player1.bounce_ball(self.ball)
45        self.player2.bounce_ball(self.ball)
46
47        # bounce ball off bottom or top
48        if (self.ball.y < self.y) or (self.ball.top > self.top):
49            self.ball.velocity_y *= -1
50
51        # went off to a side to score point?
52        if self.ball.x < self.x:
53            self.player2.score += 1
54            self.serve_ball(vel=(4, 0))
55        if self.ball.right > self.width:
56            self.player1.score += 1
57            self.serve_ball(vel=(-4, 0))
58
59    def on_touch_move(self, touch):
60        if touch.x < self.width / 3:
61            self.player1.center_y = touch.y
62        if touch.x > self.width - self.width / 3:
63            self.player2.center_y = touch.y
64
65
66class PongApp(App):
67    def build(self):
68        game = PongGame()
69        game.serve_ball()
70        Clock.schedule_interval(game.update, 1.0 / 60.0)
71        return game
72
73
74if __name__ == '__main__':
75    PongApp().run()
pong.kv:
 1#:kivy 1.0.9
 2
 3<PongBall>:
 4    size: 50, 50
 5    canvas:
 6        Ellipse:
 7            pos: self.pos
 8            size: self.size
 9
10<PongPaddle>:
11    size: 25, 200
12    canvas:
13        Rectangle:
14            pos: self.pos
15            size: self.size
16
17<PongGame>:
18    ball: pong_ball
19    player1: player_left
20    player2: player_right
21
22    canvas:
23        Rectangle:
24            pos: self.center_x - 5, 0
25            size: 10, self.height
26
27    Label:
28        font_size: 70
29        center_x: root.width / 4
30        top: root.top - 50
31        text: str(root.player1.score)
32
33    Label:
34        font_size: 70
35        center_x: root.width * 3 / 4
36        top: root.top - 50
37        text: str(root.player2.score)
38
39    PongBall:
40        id: pong_ball
41        center: self.parent.center
42
43    PongPaddle:
44        id: player_left
45        x: root.x
46        center_y: root.center_y
47
48    PongPaddle:
49        id: player_right
50        x: root.width - self.width
51        center_y: root.center_y
52
现在该去哪里?
找点乐子吧。
好的,乒乓球游戏基本完成了。如果你理解了本教程中涵盖的所有内容,给自己一个赞,并思考如何改进这个游戏。这里有一些你可以尝试的想法:
添加一些更美观的图形/图片。(提示:查看图形指令上的
source属性,例如circle或Rectangle,以将图像设置为纹理。)让游戏在达到一定分数后结束。也许当一名玩家获得10分时,你可以显示一个大的“玩家1获胜”标签,和/或添加一个主菜单来开始、暂停和重置游戏。(提示:查看
Button和Label类,并弄清楚如何使用它们的 add_widget 和 remove_widget 函数来动态添加或移除控件。)将其制作为一款4人乒乓球游戏。大多数平板电脑都支持多点触控,那么让每个边各有一名玩家,四个人同时游戏,岂不是非常酷?
修复过于简单的碰撞检测,使得用球拍末端击球时能产生更真实的反弹效果。
备注
你可以在Kivy示例目录下的`tutorials/pong/`中找到完整的源代码,以及每一步的源代码文件。