

目录
控件
Widget 简介
Widget 是 Kivy 中 GUI 界面的基础构建块。它提供了一个可用于在屏幕上绘制的 Canvas。它接收事件并对其作出反应。关于 Widget 类的深入解释,请参阅模块文档。
操作 Widget 树
Kivy 中的控件以树状结构组织。您的应用程序有一个`根控件`,它通常拥有可以再拥有自己子控件的|children|。控件的子控件通过|children|属性表示,这是一个 Kivy 的|ListProperty|。
可以通过以下方法操作控件树:
add_widget():将一个控件添加为子控件remove_widget():从子部件列表中移除一个部件clear_widgets():从部件中移除所有子部件
例如,如果你想在BoxLayout中添加一个按钮,可以这样做:
layout = BoxLayout(padding=10)
button = Button(text='My first button')
layout.add_widget(button)
按钮被添加到布局中:按钮的父属性将被设置为该布局;该布局会将按钮添加到其子元素列表中。要从布局中移除按钮,请执行以下操作:
layout.remove_widget(button)
移除后,按钮的父属性将被设置为None,并且布局会从其子组件列表中移除该按钮。
如果你想清除一个部件内的所有子部件,请使用 clear_widgets() 方法:
layout.clear_widgets()
警告
除非你确实清楚自己在做什么,否则切勿自行操作子部件列表。部件树与图形树相关联。例如,如果你将部件添加到子部件列表中,却没有将其画布添加到图形树中,那么该部件虽然会成为子部件,但屏幕上不会绘制任何内容。此外,在后续调用 add_widget、remove_widget 和 clear_widgets 时,你可能会遇到问题。
遍历树结构
Widget 类实例的 children 列表属性包含所有子组件。您可以通过以下方式轻松遍历组件树:
root = BoxLayout()
# ... add widgets to root ...
for child in root.children:
    print(child)
然而,这必须谨慎使用。如果你打算使用前一节所示的方法之一修改子部件列表,你必须使用该列表的副本,如下所示:
for child in root.children[:]:
    # manipulate the tree. For example here, remove all widgets that have a
    # width < 100
    if child.width < 100:
        root.remove_widget(child)
默认情况下,Widget 不会影响其子 Widget 的尺寸和位置。pos 属性是屏幕坐标中的绝对位置(除非你使用 relativelayout,这一点稍后会详细说明),而 size 则是绝对尺寸。
控件 Z 索引
控件绘制的顺序基于控件在控件树中的位置。add_widget 方法接受一个 index 参数,可用于指定其在控件树中的位置:
root.add_widget(widget, index)
索引值较小的控件将绘制在索引值较大的控件之上。请注意,index 的默认值为 0,因此除非另有指定,后添加的控件会绘制在其他控件之上。
使用布局来组织界面。
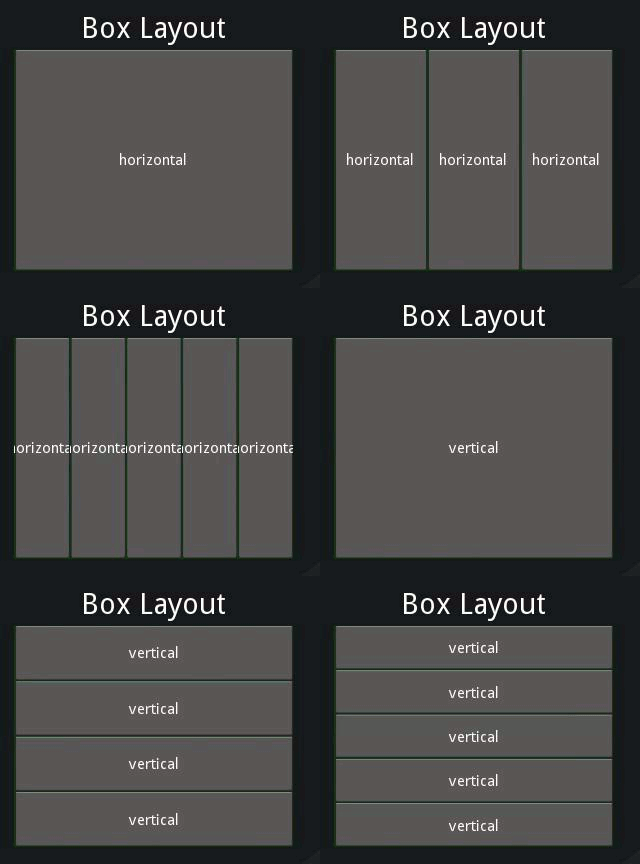
BoxLayout:以相邻方式(垂直或水平)排列子控件,以填满所有空间。子控件的`size_hint`属性可用于调整分配给每个子控件的比例,或为其中一些子控件设置固定尺寸。
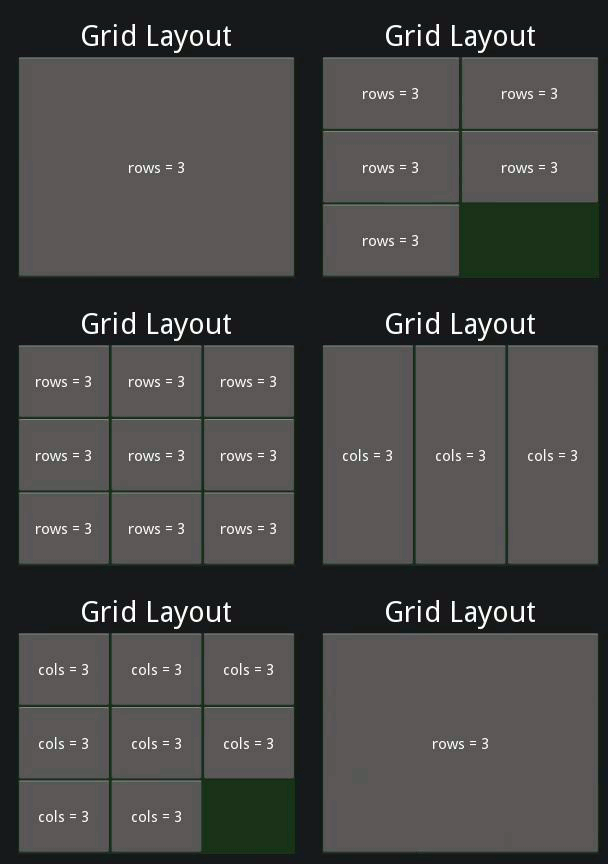
GridLayout:将控件按网格排列。您必须至少指定网格的一个维度,以便 Kivy 能够计算元素的大小及其排列方式。
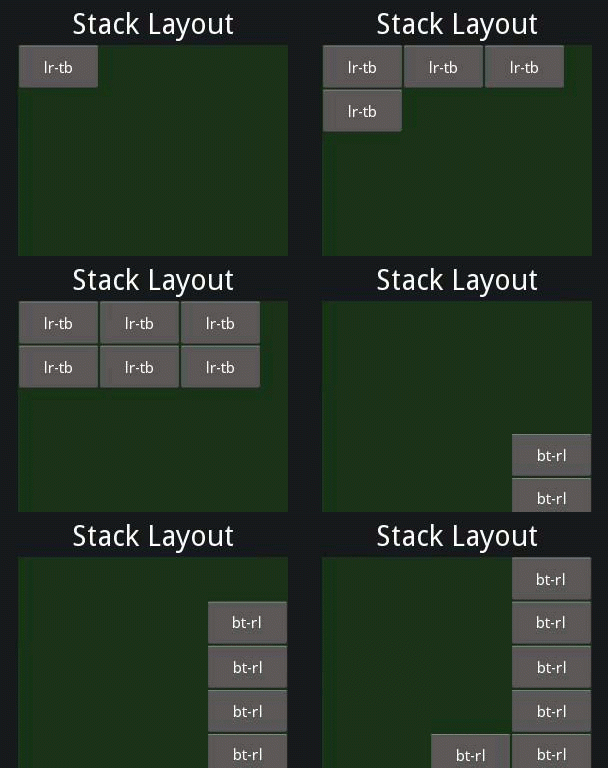
StackLayout:将子控件彼此相邻排列,但在其中一个维度上设置固定大小,而不试图让它们填满整个空间。这对于显示具有相同预定义大小的子控件非常有用。
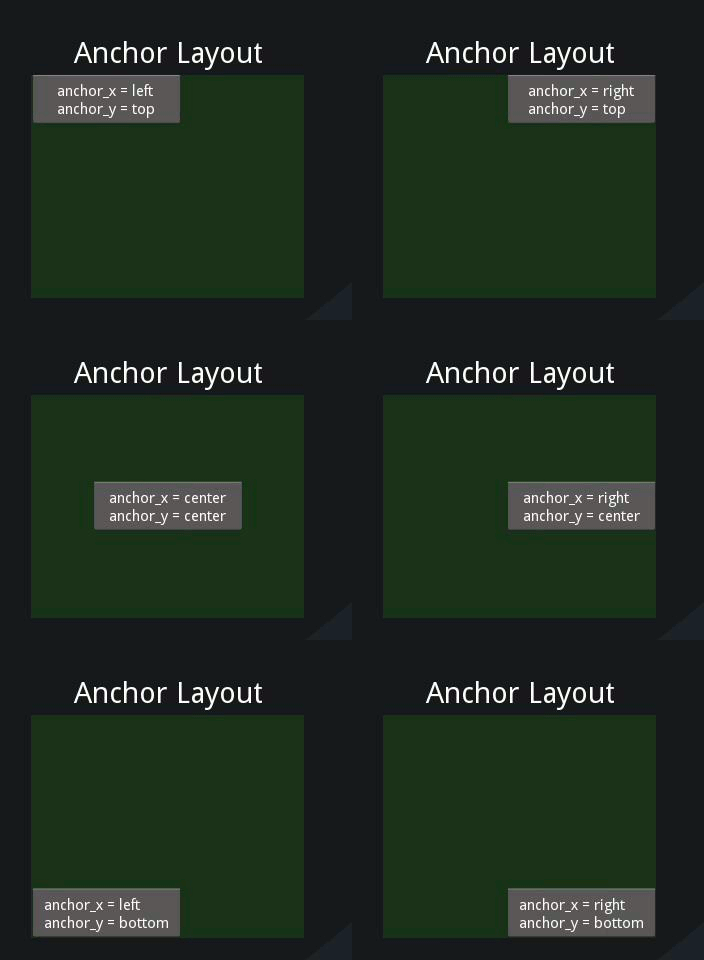
AnchorLayout:一个仅关注子控件位置的简单布局。它允许将子控件放置在相对于布局边框的位置。size_hint 不被支持。
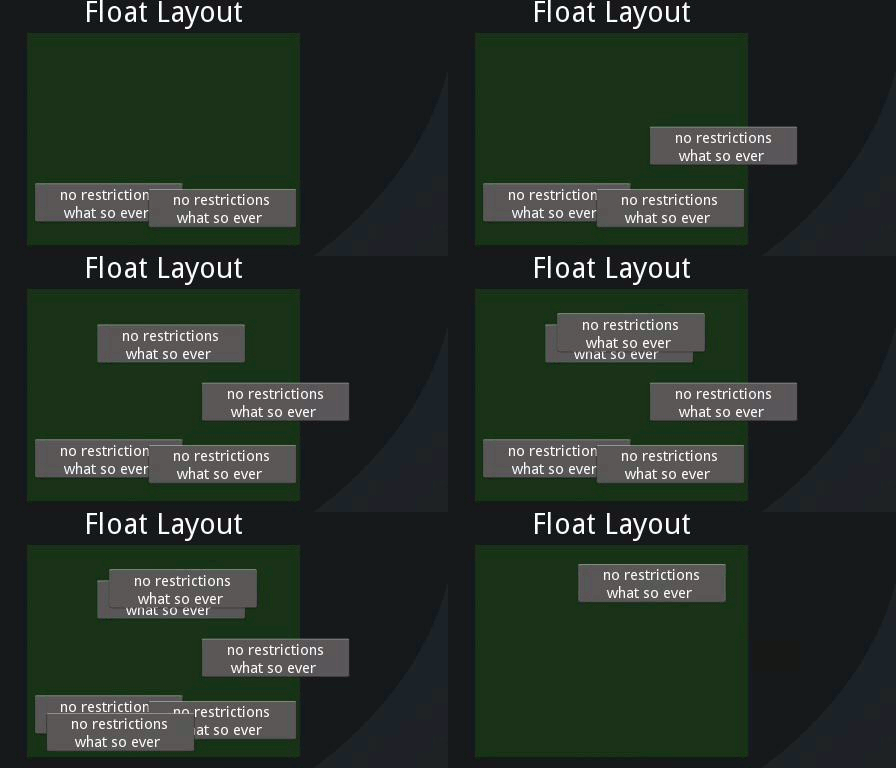
FloatLayout:允许以任意位置和尺寸放置子组件,尺寸可以是绝对的,也可以是相对于布局大小的。默认的 size_hint 为 (1, 1),这会使每个子组件与整个布局大小相同,因此如果你有多个子组件,可能需要更改此值。你可以将 size_hint 设置为 (None, None) 以使用绝对尺寸配合 size 属性。此组件同样支持 pos_hint,它是一个字典,用于设置相对于布局位置的位置。
RelativeLayout:行为与 FloatLayout 类似,但子控件的位置是相对于布局位置,而非屏幕。
请参阅各个布局的文档,以更深入地理解。
size_hint 是 size_hint_x 和 size_hint_y 的 ReferenceListProperty。它接受从 0 到 1 或 None 的值,默认值为 (1, 1)。这意味着如果该控件位于布局中,布局将在两个方向上(相对于布局的大小)尽可能多地为其分配空间。
例如,将 size_hint 设置为 (0.5, 0.8),将使 Widget 在 layout 内占可用宽度的 50% 和高度的 80%。
考虑以下示例:
BoxLayout:
    Button:
        text: 'Button 1'
        # default size_hint is 1, 1, we don't need to specify it explicitly
        # however it's provided here to make things clear
        size_hint: 1, 1
现在通过输入以下命令加载kivy目录,但请将$KIVYDIR替换为你的安装目录(可通过:py:mod:`os.path.dirname(kivy.__file__)`发现)::
cd $KIVYDIR/examples/demo/kivycatalog
python main.py
将出现一个新窗口。点击左侧“欢迎”|Spinner|下方的区域,并将该处的文本替换为上面你的kv代码。
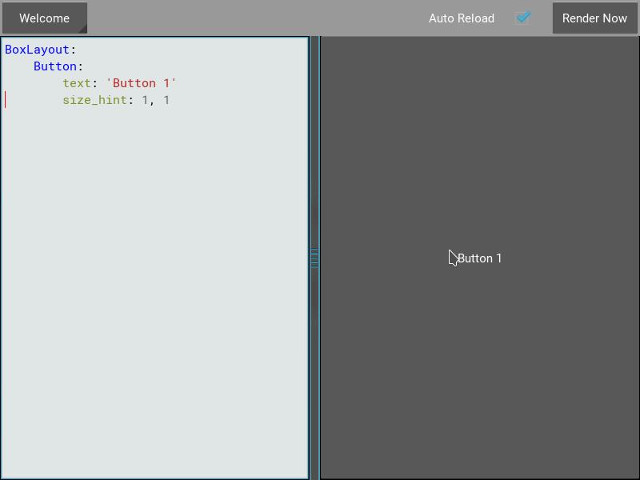
从上面的图片可以看出,Button 占据了布局 size 的 100%。
将 size_hint_x/size_hint_y 设置为 .5 将使 Widget 占据 layout width/height 的 50%。
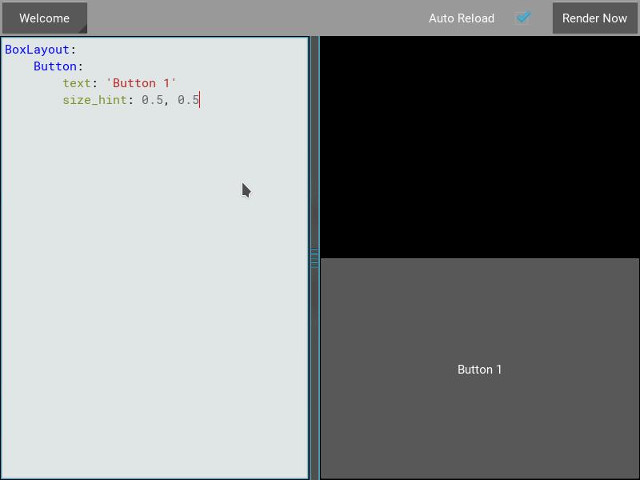
你可以看到,尽管我们将`size_hint_x`和`size_hint_y`都设为.5,但似乎只有`size_hint_y`被遵循了。这是因为当`orientation`为`vertical`时,BoxLayout`控制`size_hint_y;当`orientation`为`horizontal`时,控制`size_hint_x`。被控制的维度大小是根据`BoxLayout`中`children`的总数来计算的。在这个例子中,一个子项的`size_hint_y`被控制(.5/.5 = 1)。因此,该控件占据了父布局高度的100%。
让我们在 layout 中添加另一个 Button,看看会发生什么。
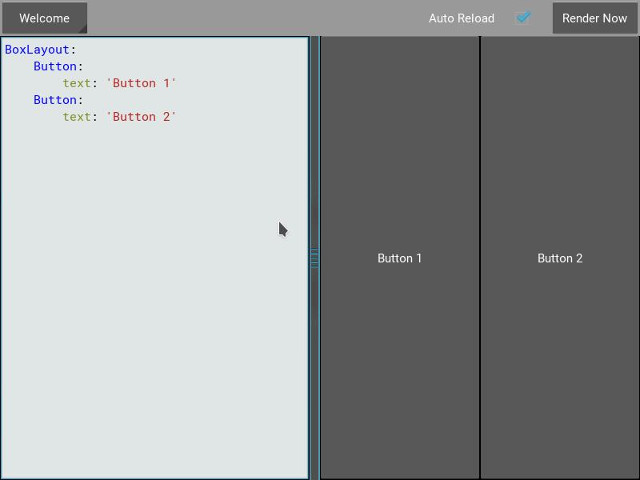
boxlayout 本质上会在其 children 之间平均分配可用空间。在我们的示例中,比例是50-50,因为我们有两个 children。让我们在一个子元素上使用 size_hint,看看结果如何。
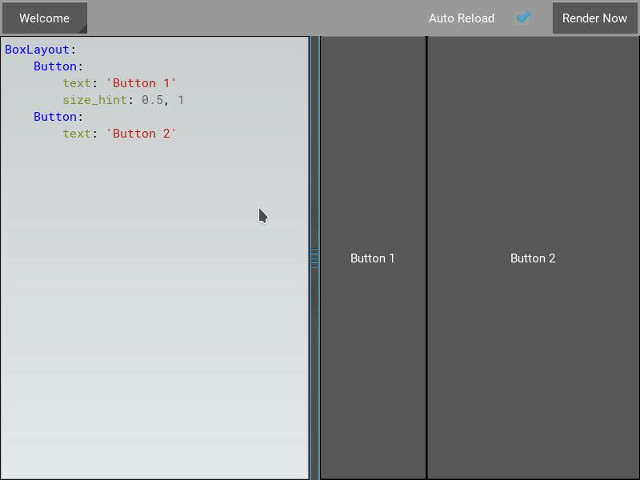
如果子组件指定了 size_hint,这表示该 Widget 将从 boxlayout 分配给它的 size 中占用多少空间。在我们的示例中,第一个 Button 为 size_hint_x 指定了 .5。该组件的空间计算方式如下:
first child's size_hint divided by
first child's size_hint + second child's size_hint + ...n(no of children)

.5/(.5+1) = .333...
BoxLayout 的剩余 width 会在其余 children 之间分配。在我们的示例中,这意味着第二个 Button 占据 layout width 的 66.66%。
尝试使用 size_hint 来熟悉它。
如果你想要控制一个 Widget 的绝对 size,可以将 size_hint_x/size_hint_y 或两者都设置为 None,这样该 widget 的 width 和/或 height 属性就会被尊重。
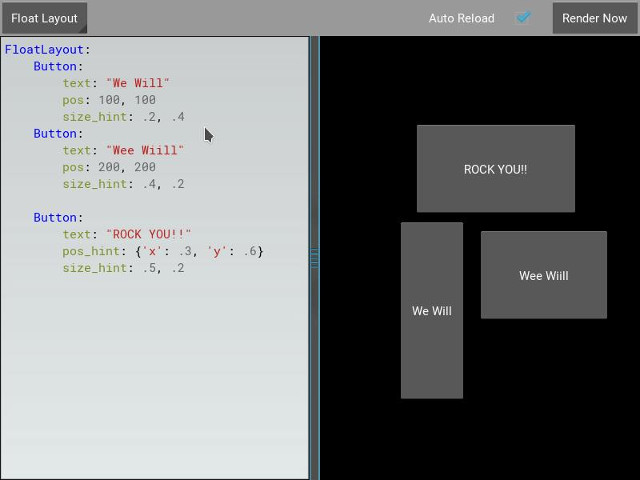
pos_hint 是一个字典,默认为空。与 size_hint 类似,布局对 pos_hint 的处理方式有所不同,但通常你可以向 pos 的任何属性(x、y、right、top、center_x、center_y)添加值,以使 Widget 相对于其 parent 进行定位。
让我们在kivycatalog中试验以下代码,以直观理解|pos_hint|:
FloatLayout:
    Button:
        text: "We Will"
        pos: 100, 100
        size_hint: .2, .4
    Button:
        text: "Wee Wiill"
        pos: 200, 200
        size_hint: .4, .2

    Button:
        text: "ROCK YOU!!"
        pos_hint: {'x': .3, 'y': .6}
        size_hint: .5, .2
这给我们带来了:
为布局添加背景
关于布局,一个经常被问到的问题是:
"How to add a background image/color/video/... to a Layout"
布局本质上没有视觉表现:默认情况下,它们没有画布指令。然而,您可以轻松地向布局实例添加画布指令,例如添加彩色背景:
在Python中:
from kivy.graphics import Color, Rectangle

with layout_instance.canvas.before:
    Color(0, 1, 0, 1) # green; colors range from 0-1 instead of 0-255
    self.rect = Rectangle(size=layout_instance.size,
                           pos=layout_instance.pos)
不幸的是,这只会按照布局的初始位置和大小绘制一个矩形。为了确保矩形始终绘制在布局内部,当布局的大小或位置发生变化时,我们需要监听这些变化并更新矩形的大小和位置。我们可以通过以下方式实现::
with layout_instance.canvas.before:
    Color(0, 1, 0, 1) # green; colors range from 0-1 instead of 0-255
    self.rect = Rectangle(size=layout_instance.size,
                           pos=layout_instance.pos)

def update_rect(instance, value):
    instance.rect.pos = instance.pos
    instance.rect.size = instance.size

# listen to size and position changes
layout_instance.bind(pos=update_rect, size=update_rect)
在kv中:
FloatLayout:
    canvas.before:
        Color:
            rgba: 0, 1, 0, 1
        Rectangle:
            # self here refers to the widget i.e FloatLayout
            pos: self.pos
            size: self.size
kv 声明设置了一个隐式绑定:最后两行 kv 代码确保当 floatlayout 的 pos 发生变化时,矩形的 pos 和 size 值会随之更新。
现在我们将上述代码片段放入Kivy应用的框架中。
纯Python方式:
from kivy.app import App
from kivy.graphics import Color, Rectangle
from kivy.uix.floatlayout import FloatLayout
from kivy.uix.button import Button


class RootWidget(FloatLayout):

    def __init__(self, **kwargs):
        # make sure we aren't overriding any important functionality
        super(RootWidget, self).__init__(**kwargs)

        # let's add a Widget to this layout
        self.add_widget(
            Button(
                text="Hello World",
                size_hint=(.5, .5),
                pos_hint={'center_x': .5, 'center_y': .5}))


class MainApp(App):

    def build(self):
        self.root = root = RootWidget()
        root.bind(size=self._update_rect, pos=self._update_rect)

        with root.canvas.before:
            Color(0, 1, 0, 1)  # green; colors range from 0-1 not 0-255
            self.rect = Rectangle(size=root.size, pos=root.pos)
        return root

    def _update_rect(self, instance, value):
        self.rect.pos = instance.pos
        self.rect.size = instance.size

if __name__ == '__main__':
    MainApp().run()
使用kv语言:
from kivy.app import App
from kivy.lang import Builder


root = Builder.load_string('''
FloatLayout:
    canvas.before:
        Color:
            rgba: 0, 1, 0, 1
        Rectangle:
            # self here refers to the widget i.e FloatLayout
            pos: self.pos
            size: self.size
    Button:
        text: 'Hello World!!'
        size_hint: .5, .5
        pos_hint: {'center_x':.5, 'center_y': .5}
''')

class MainApp(App):

    def build(self):
        return root

if __name__ == '__main__':
    MainApp().run()
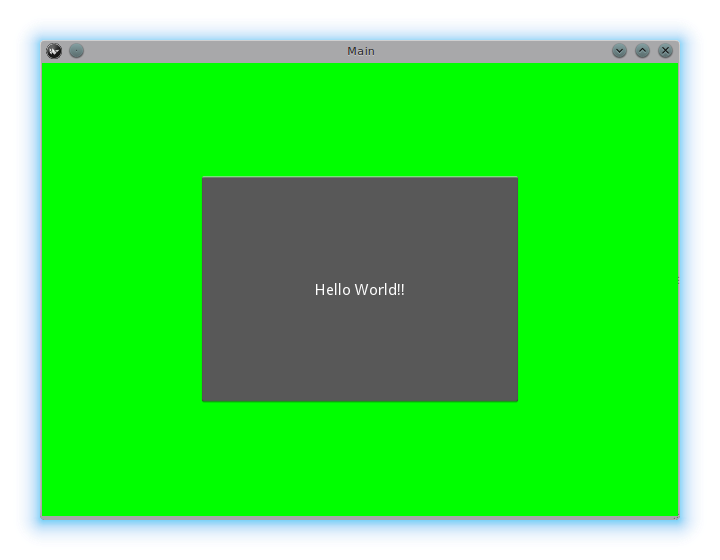
两个应用的外观应该大致如下:
为**自定义布局规则/类**的背景添加颜色。
如果我们需要在多个布局中使用背景,直接向布局实例添加背景的方式很快就会变得繁琐。为解决这一问题,您可以继承布局类并创建自己的布局,以便在布局中添加背景。
使用Python:
from kivy.app import App
from kivy.graphics import Color, Rectangle
from kivy.uix.boxlayout import BoxLayout
from kivy.uix.floatlayout import FloatLayout
from kivy.uix.image import AsyncImage


class RootWidget(BoxLayout):
    pass


class CustomLayout(FloatLayout):

    def __init__(self, **kwargs):
        # make sure we aren't overriding any important functionality
        super(CustomLayout, self).__init__(**kwargs)

        with self.canvas.before:
            Color(0, 1, 0, 1)  # green; colors range from 0-1 instead of 0-255
            self.rect = Rectangle(size=self.size, pos=self.pos)

        self.bind(size=self._update_rect, pos=self._update_rect)

    def _update_rect(self, instance, value):
        self.rect.pos = instance.pos
        self.rect.size = instance.size


class MainApp(App):

    def build(self):
        root = RootWidget()
        c = CustomLayout()
        root.add_widget(c)
        c.add_widget(
            AsyncImage(
                source="http://www.everythingzoomer.com/wp-content/uploads/2013/01/Monday-joke-289x277.jpg",
                size_hint= (1, .5),
                pos_hint={'center_x':.5, 'center_y':.5}))
        root.add_widget(AsyncImage(source='http://www.stuffistumbledupon.com/wp-content/uploads/2012/05/Have-you-seen-this-dog-because-its-awesome-meme-puppy-doggy.jpg'))
        c = CustomLayout()
        c.add_widget(
            AsyncImage(
                source="http://www.stuffistumbledupon.com/wp-content/uploads/2012/04/Get-a-Girlfriend-Meme-empty-wallet.jpg",
                size_hint= (1, .5),
                pos_hint={'center_x':.5, 'center_y':.5}))
        root.add_widget(c)
        return root

if __name__ == '__main__':
    MainApp().run()
使用kv语言:
from kivy.app import App
from kivy.uix.floatlayout import FloatLayout
from kivy.uix.boxlayout import BoxLayout
from kivy.lang import Builder


Builder.load_string('''
<CustomLayout>
    canvas.before:
        Color:
            rgba: 0, 1, 0, 1
        Rectangle:
            pos: self.pos
            size: self.size

<RootWidget>
    CustomLayout:
        AsyncImage:
            source: 'http://www.everythingzoomer.com/wp-content/uploads/2013/01/Monday-joke-289x277.jpg'
            size_hint: 1, .5
            pos_hint: {'center_x':.5, 'center_y': .5}
    AsyncImage:
        source: 'http://www.stuffistumbledupon.com/wp-content/uploads/2012/05/Have-you-seen-this-dog-because-its-awesome-meme-puppy-doggy.jpg'
    CustomLayout
        AsyncImage:
            source: 'http://www.stuffistumbledupon.com/wp-content/uploads/2012/04/Get-a-Girlfriend-Meme-empty-wallet.jpg'
            size_hint: 1, .5
            pos_hint: {'center_x':.5, 'center_y': .5}
''')

class RootWidget(BoxLayout):
    pass

class CustomLayout(FloatLayout):
    pass

class MainApp(App):

    def build(self):
        return RootWidget()

if __name__ == '__main__':
    MainApp().run()
两个应用的外观应该大致如下:
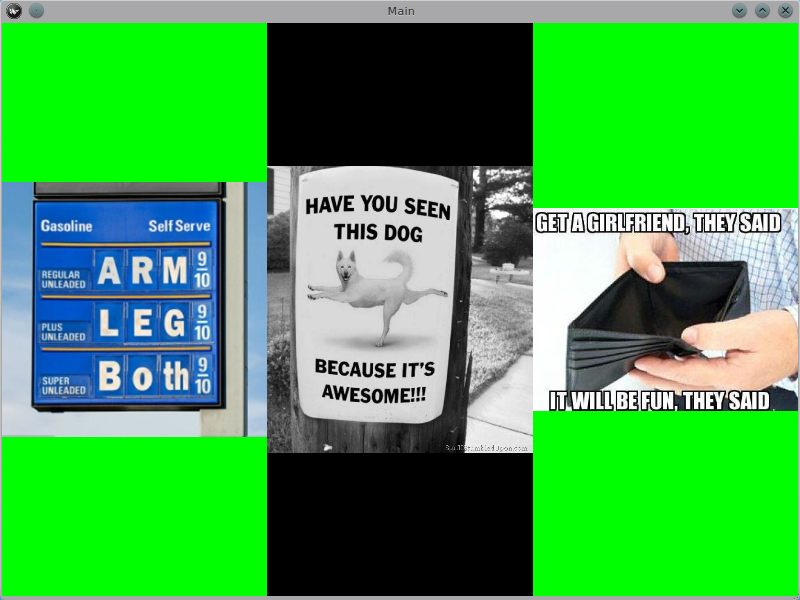
在自定义布局类中定义背景,可确保其在每个CustomLayout实例中都会被使用。
现在,要在内置的 Kivy 布局的背景中**全局**添加图像或颜色,我们需要覆盖该布局的 kv 规则。以 GridLayout 为例:
<GridLayout>
    canvas.before:
        Color:
            rgba: 0, 1, 0, 1
        BorderImage:
            source: '../examples/widgets/sequenced_images/data/images/button_white.png'
            pos: self.pos
            size: self.size
然后,我们将这段代码片段放入一个 Kivy 应用中:
from kivy.app import App
from kivy.uix.floatlayout import FloatLayout
from kivy.lang import Builder


Builder.load_string('''
<GridLayout>
    canvas.before:
        BorderImage:
            # BorderImage behaves like the CSS BorderImage
            border: 10, 10, 10, 10
            source: '../examples/widgets/sequenced_images/data/images/button_white.png'
            pos: self.pos
            size: self.size

<RootWidget>
    GridLayout:
        size_hint: .9, .9
        pos_hint: {'center_x': .5, 'center_y': .5}
        rows:1
        Label:
            text: "I don't suffer from insanity, I enjoy every minute of it"
            text_size: self.width-20, self.height-20
            valign: 'top'
        Label:
            text: "When I was born I was so surprised; I didn't speak for a year and a half."
            text_size: self.width-20, self.height-20
            valign: 'middle'
            halign: 'center'
        Label:
            text: "A consultant is someone who takes a subject you understand and makes it sound confusing"
            text_size: self.width-20, self.height-20
            valign: 'bottom'
            halign: 'justify'
''')

class RootWidget(FloatLayout):
    pass


class MainApp(App):

    def build(self):
        return RootWidget()

if __name__ == '__main__':
    MainApp().run()
结果应该看起来像这样:
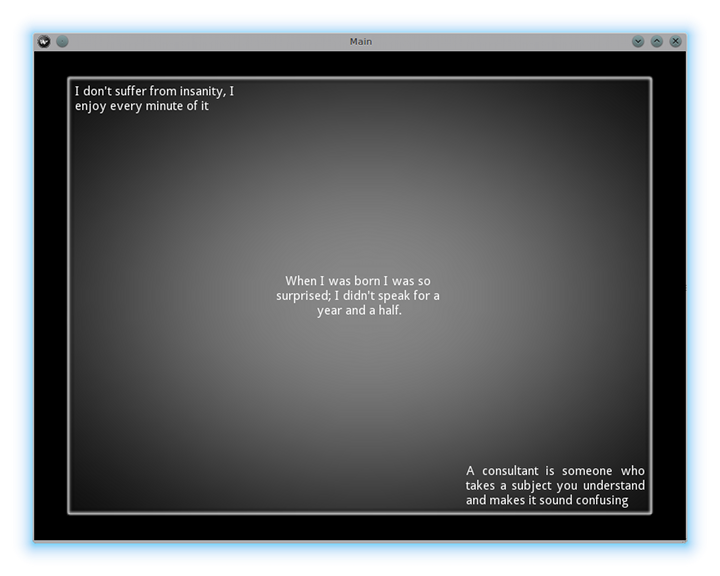
由于我们正在覆盖GridLayout类的规则,因此在我们应用中任何使用这个类的地方都会显示该图像。
来个**动画背景**怎么样?
你可以设置绘制指令(如Rectangle/BorderImage/Ellipse等)来使用特定的纹理::
Rectangle:
    texture: reference to a texture
我们使用它来显示动画背景:
from kivy.app import App
from kivy.uix.floatlayout import FloatLayout
from kivy.uix.gridlayout import GridLayout
from kivy.uix.image import Image
from kivy.properties import ObjectProperty
from kivy.lang import Builder


Builder.load_string('''
<CustomLayout>
    canvas.before:
        BorderImage:
            # BorderImage behaves like the CSS BorderImage
            border: 10, 10, 10, 10
            texture: self.background_image.texture
            pos: self.pos
            size: self.size

<RootWidget>
    CustomLayout:
        size_hint: .9, .9
        pos_hint: {'center_x': .5, 'center_y': .5}
        rows:1
        Label:
            text: "I don't suffer from insanity, I enjoy every minute of it"
            text_size: self.width-20, self.height-20
            valign: 'top'
        Label:
            text: "When I was born I was so surprised; I didn't speak for a year and a half."
            text_size: self.width-20, self.height-20
            valign: 'middle'
            halign: 'center'
        Label:
            text: "A consultant is someone who takes a subject you understand and makes it sound confusing"
            text_size: self.width-20, self.height-20
            valign: 'bottom'
            halign: 'justify'
''')


class CustomLayout(GridLayout):

    background_image = ObjectProperty(
        Image(
            source='../examples/widgets/sequenced_images/data/images/button_white_animated.zip',
            anim_delay=.1))


class RootWidget(FloatLayout):
    pass


class MainApp(App):

    def build(self):
        return RootWidget()

if __name__ == '__main__':
    MainApp().run()
要理解这里发生了什么,请从第13行开始:
texture: self.background_image.texture
这指定了每当 background_image 的 texture 属性更新时,BorderImage 的 texture 属性也会随之更新。我们在第40行定义了 background_image 属性:
background_image = ObjectProperty(...
这将`background_image`设置为一个|ObjectProperty|,在其中我们添加了一个|Image|控件。图像控件具有`texture`属性;在您看到`self.background_image.texture`的地方,这设置了一个引用`texture`指向该属性。|Image|控件支持动画:每当动画变化时,图像的纹理会被更新,同时BorderImage指令的纹理也会在这个过程中被更新。
你也可以直接将自定义数据绘制到纹理上。具体细节,请参阅 Texture 的文档。
嵌套布局
是的!看到这个过程的可扩展性有多强,真是相当有趣。
尺寸与位置度量
Kivy 默认的长度单位是像素,所有尺寸和位置默认都以像素表示。您也可以使用其他单位来表达它们,这有助于在不同设备间实现更好的一致性(这些单位会自动转换为像素大小)。
可用的单位有 pt、mm、cm、inch、dp 和 sp。您可以在 metrics 文档中了解它们的用法。
您还可以尝试使用 screen 来模拟不同设备屏幕,以便为您的应用程序进行测试。
使用屏幕管理器进行屏幕分离
如果你的应用程序由多个屏幕组成,你可能希望有一种简便的方法在 Screen 之间导航。幸运的是,有 ScreenManager 类,它允许你分别定义屏幕,并设置从一个屏幕到另一个屏幕的 TransitionBase。