

事件与属性
事件是Kivy编程中的一个重要组成部分。对于有GUI开发经验的人来说,这可能并不令人惊讶,但对于新手来说,这是一个重要的概念。一旦你理解了事件是如何工作的以及如何绑定它们,你就会在Kivy中到处看到它们的身影。它们使得在Kivy中构建你想要的任何行为变得容易。
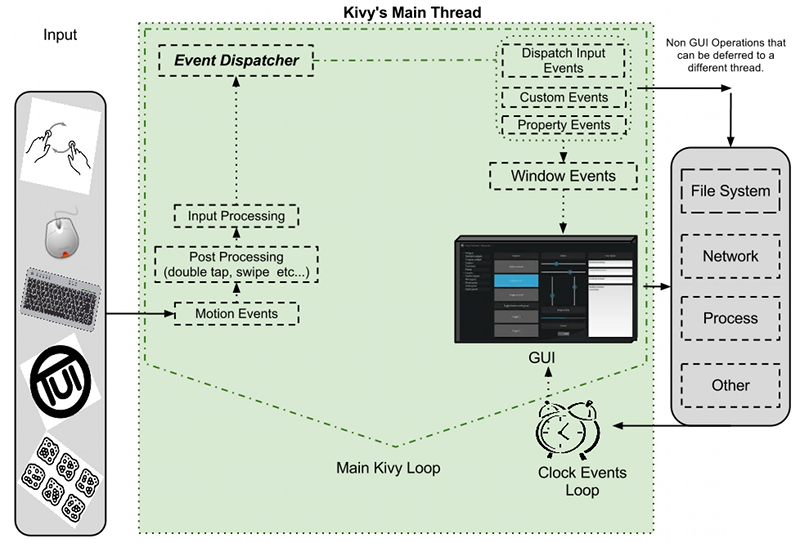
下图展示了Kivy框架中事件的处理方式。
事件分发器简介
框架中最重要的基类之一是 EventDispatcher 类。该类允许您注册事件类型,并将其分发给感兴趣的各方(通常是其他事件分发器)。 Widget、Animation 和 Clock 类是事件分发器的示例。
EventDispatcher 对象依赖主循环来生成和处理事件。
主循环
如上图所示,Kivy 有一个 主循环。该循环在应用程序的整个生命周期内运行,仅在退出应用程序时结束。
在循环内部,每次迭代时,事件由用户输入、硬件传感器或其他一些来源产生,并将帧渲染到显示器上。
你的应用程序将指定回调函数(稍后会详细讨论),这些回调由主循环调用。如果某个回调执行时间过长或根本不退出,主循环就会被破坏,你的应用将无法正常工作。
在Kivy应用中,必须避免长时间/无限循环或休眠。例如,以下代码同时涉及了这两种情况:
while True:
    animate_something()
    time.sleep(.10)
当你运行这段代码时,程序将永远不会退出你的循环,从而阻止Kivy执行所有其他需要完成的任务。结果,你只会看到一个黑色窗口,并且无法与之交互。相反,你需要“调度”你的``animate_something()``函数,使其被反复调用。
调度重复事件
你可以使用 schedule_interval() 在指定的时间间隔内调用一个函数或方法。以下是一个示例,每1/30秒(即每秒30次)调用名为 my_callback 的函数:
def my_callback(dt):
    print('My callback is called', dt)
event = Clock.schedule_interval(my_callback, 1 / 30)
你有多种方式来取消之前安排的事件。一种是使用 cancel() 或 unschedule():
event.cancel()
或:
Clock.unschedule(event)
或者,您可以在回调中返回False,这样您的事件将自动被取消调度:
count = 0
def my_callback(dt):
    global count
    count += 1
    if count == 10:
        print('Last call of my callback, bye bye !')
        return False
    print('My callback is called')
Clock.schedule_interval(my_callback, 1 / 30)
调度一次性事件
使用 schedule_once(),你可以“稍后”调用一个函数,比如在下一帧,或者在X秒后::
def my_callback(dt):
    print('My callback is called !')
Clock.schedule_once(my_callback, 1)
这将在1秒后调用``my_callback``。第二个参数是等待调用函数前的时间量,单位为秒。然而,通过为第二个参数设置特殊值,你可以实现其他一些效果:
如果X大于0,回调将在X秒后被调用。
如果X为0,回调将在下一帧之后被调用。
如果 X 为 -1,回调将在下一帧之前被调用。
-1 主要用于你已经在某个计划事件中,并且希望在下一帧发生之前安排一次调用的情况。
重复函数调用的第二种方法是先使用 schedule_once() 调度一次回调,然后在回调内部再次调用该函数:
def my_callback(dt):
    print('My callback is called !')
    Clock.schedule_once(my_callback, 1)
Clock.schedule_once(my_callback, 1)
警告
虽然主循环会尽量按照请求的时间表执行,但关于计划回调何时被精确调用仍存在一定的不确定性。有时,应用程序中的另一个回调或某些其他任务耗时超出预期,因此时间安排可能会略有偏差。
在重复回调问题的后一种解决方案中,下一次迭代将在上一次迭代结束后至少一秒被调用。然而,使用 schedule_interval() 时,回调会每秒被调用一次。
触发事件
有时您可能希望将某个函数安排为仅在下一帧调用一次,以避免重复调用。您可能会尝试这样做:
# First, schedule once.
event = Clock.schedule_once(my_callback, 0)

# Then, in another place you will have to unschedule first
# to avoid duplicate call. Then you can schedule again.
Clock.unschedule(event)
event = Clock.schedule_once(my_callback, 0)
这种触发器的编程方式成本较高,因为即使事件已经完成,你仍会调用unschedule。此外,每次都会创建一个新事件。建议改用触发器(trigger):
trigger = Clock.create_trigger(my_callback)
# later
trigger()
每次调用trigger()时,它都会安排一次回调的调用。如果该调用已被安排,则不会重新安排。
控件事件
控件有2种默认类型的事件:
属性事件:当您的部件更改其位置或大小时,会触发一个事件。
控件定义的事件:例如,当按钮被按下或释放时,会触发相应的事件。
关于控件触摸事件的管理与传播机制的讨论,请参阅 控件触摸事件冒泡 部分。
创建自定义事件
要创建带有自定义事件的事件分发器,您需要在类中注册事件的名称,然后创建一个同名的方法。
请参考以下示例:
class MyEventDispatcher(EventDispatcher):
    def __init__(self, **kwargs):
        self.register_event_type('on_test')
        super(MyEventDispatcher, self).__init__(**kwargs)

    def do_something(self, value):
        # when do_something is called, the 'on_test' event will be
        # dispatched with the value
        self.dispatch('on_test', value)

    def on_test(self, *args):
        print("I am dispatched", args)
附加回调
要使用事件,您必须将回调函数绑定到它们。当事件被分发时,您的回调函数将携带与该特定事件相关的参数被调用。
回调可以是任何Python可调用对象,但你需要确保它能接受事件发出的参数。为此,通常最安全的做法是接受`*args`参数,这样会将所有参数捕获到`args`列表中。
示例:
def my_callback(value, *args):
    print("Hello, I got an event!", args)


ev = MyEventDispatcher()
ev.bind(on_test=my_callback)
ev.do_something('test')
请参阅 kivy.event.EventDispatcher.bind() 方法的文档,以获取更多关于如何附加回调的示例。
属性(Properties)简介
属性是定义事件并绑定到它们的绝佳方式。本质上,它们会产生事件,使得当你的对象属性发生变化时,所有引用该属性的属性都会自动更新。
有不同类型的属性来描述你想要处理的数据类型。
属性的声明
要声明属性,你必须在类级别进行声明。类会在你的对象创建时自动实例化真实的属性。这些属性并非普通的属性:它们是基于你的属性创建事件的机制。
class MyWidget(Widget):

    text = StringProperty('')
当重写 __init__ 时,始终 接受 **kwargs,并使用 super() 调用父类的 __init__ 方法,传入你的类实例::
def __init__(self, **kwargs):
    super(MyWidget, self).__init__(**kwargs)
调度属性事件
Kivy 属性默认提供一个 on_<property_name> 事件。当属性的值发生变化时,该事件会被调用。
备注
如果属性的新值与当前值相等,则不会调用 on_<property_name> 事件。
例如,考虑以下代码:
 1 class CustomBtn(Widget):
 2
 3     pressed = ListProperty([0, 0])
 4
 5     def on_touch_down(self, touch):
 6         if self.collide_point(*touch.pos):
 7             self.pressed = touch.pos
 8             return True
 9         return super(CustomBtn, self).on_touch_down(touch)
10
11     def on_pressed(self, instance, pos):
12         print('pressed at {pos}'.format(pos=pos))
在上述代码的第3行:
pressed = ListProperty([0, 0])
我们定义了一个类型为 ListProperty 的 pressed 属性,并为其设置了默认值 [0, 0]。从此刻起,每当该属性的值发生变化时,on_pressed 事件就会被触发。
第5行:
def on_touch_down(self, touch):
    if self.collide_point(*touch.pos):
        self.pressed = touch.pos
        return True
    return super(CustomBtn, self).on_touch_down(touch)
我们重写了Widget类的:meth:`on_touch_down`方法。在这里,我们检查`touch`是否与我们的widget发生碰撞。
如果触摸事件落在我们的控件内部,我们将 pressed 的值改为 touch.pos 并返回 True,表示我们已经消费了该触摸事件,不希望它继续传播。
最后,如果触摸事件发生在我们控件之外,我们使用 super(...) 调用原始事件并返回结果。这样,触摸事件的传播就能像正常情况下一样继续进行。
最后,在第11行:
def on_pressed(self, instance, pos):
    print('pressed at {pos}'.format(pos=pos))
我们定义了一个`on_pressed`函数,该函数将在属性值发生变化时由属性调用。
备注
on_<prop_name> 事件在定义该属性的类内部被调用。若要监视或观察类外部对该属性的任何更改,您应如下所示绑定到该属性。
绑定属性
当你只能访问一个控件实例时,如何监控属性的变化?你可以*绑定*到该属性::
your_widget_instance.bind(property_name=function_name)
例如,考虑以下代码:
 1 class RootWidget(BoxLayout):
 2
 3     def __init__(self, **kwargs):
 4         super(RootWidget, self).__init__(**kwargs)
 5         self.add_widget(Button(text='btn 1'))
 6         cb = CustomBtn()
 7         cb.bind(pressed=self.btn_pressed)
 8         self.add_widget(cb)
 9         self.add_widget(Button(text='btn 2'))
10
11     def btn_pressed(self, instance, pos):
12         print('pos: printed from root widget: {pos}'.format(pos=.pos))
如果你直接运行这段代码,会在控制台中看到两条打印语句。一条来自 CustomBtn 类内部调用的 on_pressed 事件,另一条来自我们绑定到属性变化的 btn_pressed 函数。
两个函数都被调用的原因很简单:绑定并不意味着覆盖。同时拥有这两个函数是多余的,通常你应当只使用其中一种方法来监听/响应属性变化。
你还应注意传递给`on_<property_name>`事件或绑定到该属性的函数的参数。
def btn_pressed(self, instance, pos):
第一个参数是 self,它是定义此函数的类的实例。你可以使用内联函数,如下所示:
1 cb = CustomBtn()
2
3 def _local_func(instance, pos):
4     print('pos: printed from root widget: {pos}'.format(pos=pos))
5
6 cb.bind(pressed=_local_func)
7 self.add_widget(cb)
第一个参数将是定义该属性的类的`instance`。
第二个参数是 value,即属性的新值。
以下是完整的示例,由上述代码片段整合而成,您可以直接复制粘贴到编辑器中尝试运行。
 1 from kivy.app import App
 2 from kivy.uix.widget import Widget
 3 from kivy.uix.button import Button
 4 from kivy.uix.boxlayout import BoxLayout
 5 from kivy.properties import ListProperty
 6
 7 class RootWidget(BoxLayout):
 8
 9     def __init__(self, **kwargs):
10         super(RootWidget, self).__init__(**kwargs)
11         self.add_widget(Button(text='btn 1'))
12         cb = CustomBtn()
13         cb.bind(pressed=self.btn_pressed)
14         self.add_widget(cb)
15         self.add_widget(Button(text='btn 2'))
16
17     def btn_pressed(self, instance, pos):
18         print('pos: printed from root widget: {pos}'.format(pos=pos))
19
20 class CustomBtn(Widget):
21
22     pressed = ListProperty([0, 0])
23
24     def on_touch_down(self, touch):
25         if self.collide_point(*touch.pos):
26             self.pressed = touch.pos
27             # we consumed the touch. return False here to propagate
28             # the touch further to the children.
29             return True
30         return super(CustomBtn, self).on_touch_down(touch)
31
32     def on_pressed(self, instance, pos):
33         print('pressed at {pos}'.format(pos=pos))
34
35 class TestApp(App):
36
37     def build(self):
38         return RootWidget()
39
40
41 if __name__ == '__main__':
42     TestApp().run()
运行上述代码将得到以下输出:
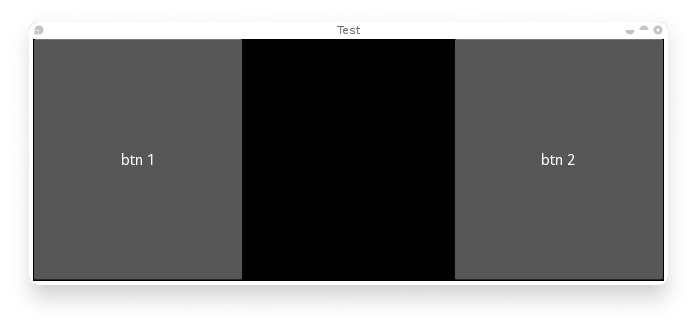
我们的CustomBtn没有视觉表示,因此显示为黑色。您可以触摸/点击黑色区域,在控制台上查看输出。
复合属性
在定义 AliasProperty 时,通常需要自行定义 getter 和 setter 函数。在这里,你需要通过 bind 参数来决定何时调用这些 getter 和 setter 函数。
考虑以下代码。
 1 cursor_pos = AliasProperty(_get_cursor_pos, None,
 2                            bind=('cursor', 'padding', 'pos', 'size',
 3                                  'focus', 'scroll_x', 'scroll_y',
 4                                  'line_height', 'line_spacing'),
 5                            cache=True)
 6 '''Current position of the cursor, in (x, y).
 7
 8 :attr:`cursor_pos` is an :class:`~kivy.properties.AliasProperty`,
 9 read-only.
10 '''
这里的 cursor_pos 是一个 AliasProperty,它使用 getter _get_cursor_pos,而 setter 部分设置为 None,这意味着这是一个只读属性。
末尾的bind参数定义了当`bind=`参数中使用的任何属性发生变化时,会触发`on_cursor_pos`事件。